Mites in Your Worm Composting Bin: Why They’re There and How to Control Them?
Table of contents:
How do mites impact the composting process?
Why do mites infest worm bins?
How to identify mites infesting the worm bin?
How to get rid of mites in worm bin?
4. Use moistened newspapers as a trap
How to prevent mites in the future?
4. Remove debris from the vicinity
Why are my worms crawling out of my worm bin?
What are the red bugs in my vermicompost?
What is killing my earthworms?
What do you expect when you check your worm bins?
Bedding? Yes!
Organic matter? Yes!
Your Beloved Worms? Yes!
That's pretty much it! But what if you spot mites in the worm bin? They aren't supposed to be there. According to a report published in National Library of Medicine, there are more than 55,000 mites species known to man. While many of them don’t cause a problem in a worm bin but some like red mites certainly do. That’s why getting rid of them in time is important.
Instead of panicking, simply check out the guide below because it covers what mites are, how to spot them, and even how to get rid of mites in the worm bin. Let's start with the very basics.
What are mites?

The Illinois Department of Public Health defines mites as insect-like organisms that either parasitize other beings or prey on them. The problem is that mites adversely impact every living being they come in contact with, like humans, worms, animals, etc. It means if you observe them in your worm bin, that certainly isn't good news.
Before checking out your worm bin, keep in mind a few things about mites:
-
Mites can be of many different types, and depending on the type, their appearance can vary.
-
Mites can scavenge on worms and the organic matter within the bin.
-
As per a post by the Illinois Department of Public Health , mites that come in contact with humans can cause to skin irritation and other issues.
By now, you know that mites aren't good news, but worm bin mites cause even more harm.
How do mites impact the composting process?
1. Feasting on worms
Mites, in certain cases, feed on worms. Even though they prefer aged worms, the composting process does slow down due to these predators eliminating some worms.
When you have a small number of mites in your bin, impact is minimal. As the number of mites increases, the number of worms they will eliminate will also increase, resulting in a slow-down of the entire process.
2. Reduction of food supply
White or brown mites consume the same food as worms. They can deprive the worms of nutrients. If the population of mites increases significantly, worms don't even surface which leads to less nutrient supply and reproduction.
Your bin will only generate proper compost if the worms thrive. Since the mites prohibit that, it would hamper the entire purpose of compost creation.
3. Egg destruction
Composting worms usually reproduce pretty fast. That's the reason when worms are left undisturbed in the bin, their population increases which aids the composting process.
While white or brown mites only feast on the worm's food, red mites are different, and they suck fluids from the egg capsules. That hampers the population growth of worms, which once again can hamper the composting process.
Why do mites infest worm bins?

It's now time to understand why you might find these tiny white bugs in worm bin.
1. Organic matter
Wikipedia states that it's common for mites to eat dead fungal and organic matter. Isn't that what a worm bin is filled with?
Apart from that, the parasitic mites also feast on plants and animals. In a worm bin, they find plenty of such organic matter and a host in the form of worms. It means a worm bin provides them with plenty of food, which is one of the primary reasons they infest it.
2. Moist conditions
Mites directly absorb moisture from the air. In the absence of moisture, they desiccate, which isn't conducive to survival. Therefore, when the outside environment becomes hot and dusty, they seek sources of moisture.
Most worm bins provide them with this moisture. Also, the closed worm bins don't let the moisture escape.
Isn't that a great moisture source for them?
You bet!
Mites' population increases exponentially in moist conditions. It means that even if you currently notice only a handful of mites in your worm bin, the numbers can go up quickly if you don't do anything about them.
3. Natural habitat
Most pests and insects search for their ideal natural habitat. For mites, a worm bin provides such habitat because:
-
They have food in the form of worms and organic matter.
-
As highlighted above, they have moisture.
-
As per the Journal of Allergy and Clinical Immunology , they hate the sun because it makes them dry and the climate hostile. Since most worm bins are covered, they can thrive inside the bin.
The point is that a worm bin is close to their natural habitat, so they infest worm bins.
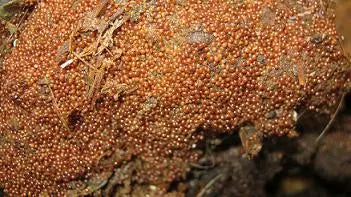
How to identify mites infesting the worm bin?

If you are wondering how to identify mites in my worm bin?, Watch out for the following characteristics:
-
Mites will be white or red.
-
They usually move slower than worms.
-
You would usually find them in clusters.
How to get rid of mites in worm bin?

1. Remove the food
Usually, mites gather around a particular food type or piece. If you notice that, it's best to remove it manually. Do wear gloves while doing so. In case you are wondering which are these foods, they are:
-
Pumpkin
-
Watermelon
-
Cantaloupe
Any foodstuff that is wet and mushy is well-liked by mites. So, check the contents of the worm bin and remove the foodstuffs on which you find mites crawling.
2. Use DE
Diatomaceous earth (DE) is an effective organic mixture that eliminates mites that come in contact with it. Simply sprinkle it on the vermicompost or the organic matter in the worm bin. Any mites that come in contact with DE will be killed. The best thing is it won't impact the worms.
In case you are wondering where to buy DE from, check out Safer Brand 51704 Food Grade Diatomaceous Earth .
Note:
3. Sunlight to the rescue
According to a study published in the Journal of Allergy and Clinical Immunology , sunlight exposure can eliminate all mites. If you open your worm bin to the sun, the conditions will be hostile for mites. However, before you open the worm bin to the sunlight for hours, remember that the bin also has worms. According to the University of Illinois Urbana-Champaign , worms should be kept out of sunlight.
So, what’s the solution?
The answer is to open the worm bin to sunlight for only 1 minute at a time daily. Sure enough, that will not kill all mites in 1 day but will eventually eliminate their population.
4. Use moistened newspapers as a trap
As highlighted above, mites need moist surroundings. Why not use this as bait?
The plan is to place moist newspapers or burlap bags above the worm bedding. As soon as fast moving mites in worm bin accumulate on them, remove the newspaper or bag manually. You might have to repeat this daily till the mites population dwindles. So, if you are wondering how to get rid of white mites in worm bin, this is the solution.
5. Divert them with food
Note:
6. Eliminate them with water
Adding more water to the worm bedding is a simple way to separate mites from worms.
Don't flood it completely, but add a significant quantity of water. That will keep the worms down while mites will move to the surface. Soon, they will gather in such large numbers that they will be visible on the surface. After that, use a propane torch to apply heat to the bed top to eliminate the mites. Repeat this procedure every 3 days until the bulk of the mites population gets eliminated.
Before you opt for this method, there are a few things to keep in mind:
-
Ensure you use protective equipment while using a propane torch.
-
Before torching the top of the bed, check if worms have moved up along with the mites. In that case, waiting for the worms to settle down is best.
-
Even with proper supervision, you might eliminate some worms in collateral damage. It's rare but can happen. So, use this method only if you are ok with it.
-
Keep the propane torch at such a distance from the surface that only limited heat reaches the surface and doesn't penetrate beyond it; otherwise, you might kill more worms.
7. Use sulfur
According to a fact sheet by the National Pesticide Information Center, sulfur can kill mites. That’s why it has been used in various pesticides since the 1920s.
You might think, what about worms?
The good news is that it doesn’t kill worms but does change the mix's pH level.
If you are wondering how to use it, follow the procedure below:
Step 1: Soak the worm bed with water.
Step 2: As highlighted above, doing so will cause the worms to settle down while the mites will surface. Once mites surface, dust sulfur 1/16 ounce of sulfur powder per square foot area.
That should eliminate most mites while the worms will be well protected.
As for the pH level, check the pH before and after, using pH paper like Aulyn pH test paper . In case pH reduces afterwards, that is, the mixture becomes acidic, take corrective steps. According to Cornell University , the best way to increase the pH level is to aerate the compost mixture.
8. Try neem oil
According to a study , neem oil and neem extract can reduce the population of mites by as much as 80% in just 1 week. However, for such effectiveness, the mites must come in contact with neem oil. For that to happen, spray neem oil on the organic matter once every 3 days. Such frequency ensures most of the mites population comes in contact with neem oil leading to their extinction.
According to a study , neem oil in appropriate quantities is safe for beneficial worms. So, you will kill all the mites and nothing will happen to your worms.
Above, we have covered not just 1 or 2 but 8 different ways to save your compost bin and let the worms thrive while eliminating mites.
How to prevent mites in the future?

Apart from knowing how to get rid of mites in worm bin, it's equally important to know how do mites get into worm bin and how to prevent this.
1. Keep your hands clean
2. Always use gloves
3. Plug in the holes
4. Remove debris from the vicinity
Just like humans, animals, too, can aid the spread of mites. The problem is you can’t make animals wear protective equipment, but you can discourage them from going anywhere near the worm bin.
So, keep the surroundings of the worm bin clean. Remove any debris, sticks, or rocks from the area of the worm bin. At all costs, ensure there is no leftover food or organic matter nearby.
5. Maintain carbon levels
The higher the carbon levels in the bin, the less likely mites are to infest it. You can fill your worm bin with as much as 70% carbon. Some things you can add to your bin to increase carbon levels include:
-
Shredded paper
-
Leaves
You should mix it with the organic matter as well as cover the organic matter with it on top. They would soak up the excessive moisture and worms feast on them. So, you would be adding something that keeps mites away and feeds your worms.
Isn’t that a win-win?
You bet!
6. Add calcium
Adding extra calcium helps keep the mites away, too. To add calcium to the worm bin, you can add:
-
Ground eggshells
-
Ground oyster shells
Both these add calcium to the mix and increase the pH levels. Increasing pH levels toward the neutral level also reduces the mite population. Hence, this measure can prevent mites effectively.
FAQs
Are mites bad for compost?
Why are my worms crawling out of my worm bin?
What are the red bugs in my vermicompost?
What is killing my earthworms?
Conclusion
Worm bin mites is certainly a problem. However, following the tips above will help you eliminate them and keep them at bay. Thereafter all you need to do is to give your worms enough time to produce bountiful compost.
As always, if you want purebred worms to make compost, check out the ones we are selling here.
Sources:
https://en.wikipedia.org/wiki/Mite#:~:text=and%20dead%20plant%20and%20fungal%20material%2C
https://www.jacionline.org/article/S0091-6749(94)70058-3/fulltext
https://compost.css.cornell.edu/monitor/monitorph.html#:~:text=Aerating%20or%20mixing%20the%20system%20should%20reduce%20this%20acidity.%20Adding%20lime%20(calcium%20carbonate)%20generally%20is%20not%20recommended%20because%20it%20causes%20ammonium%20nitrogen%20to%20be%20lost%20to%20the%20atmosphere%20as%20ammonia%20gas.


Leave a comment
All comments are moderated before being published.
This site is protected by hCaptcha and the hCaptcha Privacy Policy and Terms of Service apply.